You've explored the rich history of Middle Eastern mosaic traditions, studied contemporary artists who've reimagined these techniques, and designed your own geometric pattern. Now it's time to bring everything together and create your own mosaic-inspired artwork using real glass tiles – with your tessellating pattern from Lesson 3 as a required element!
Project Requirements
1 Sketchbook Design
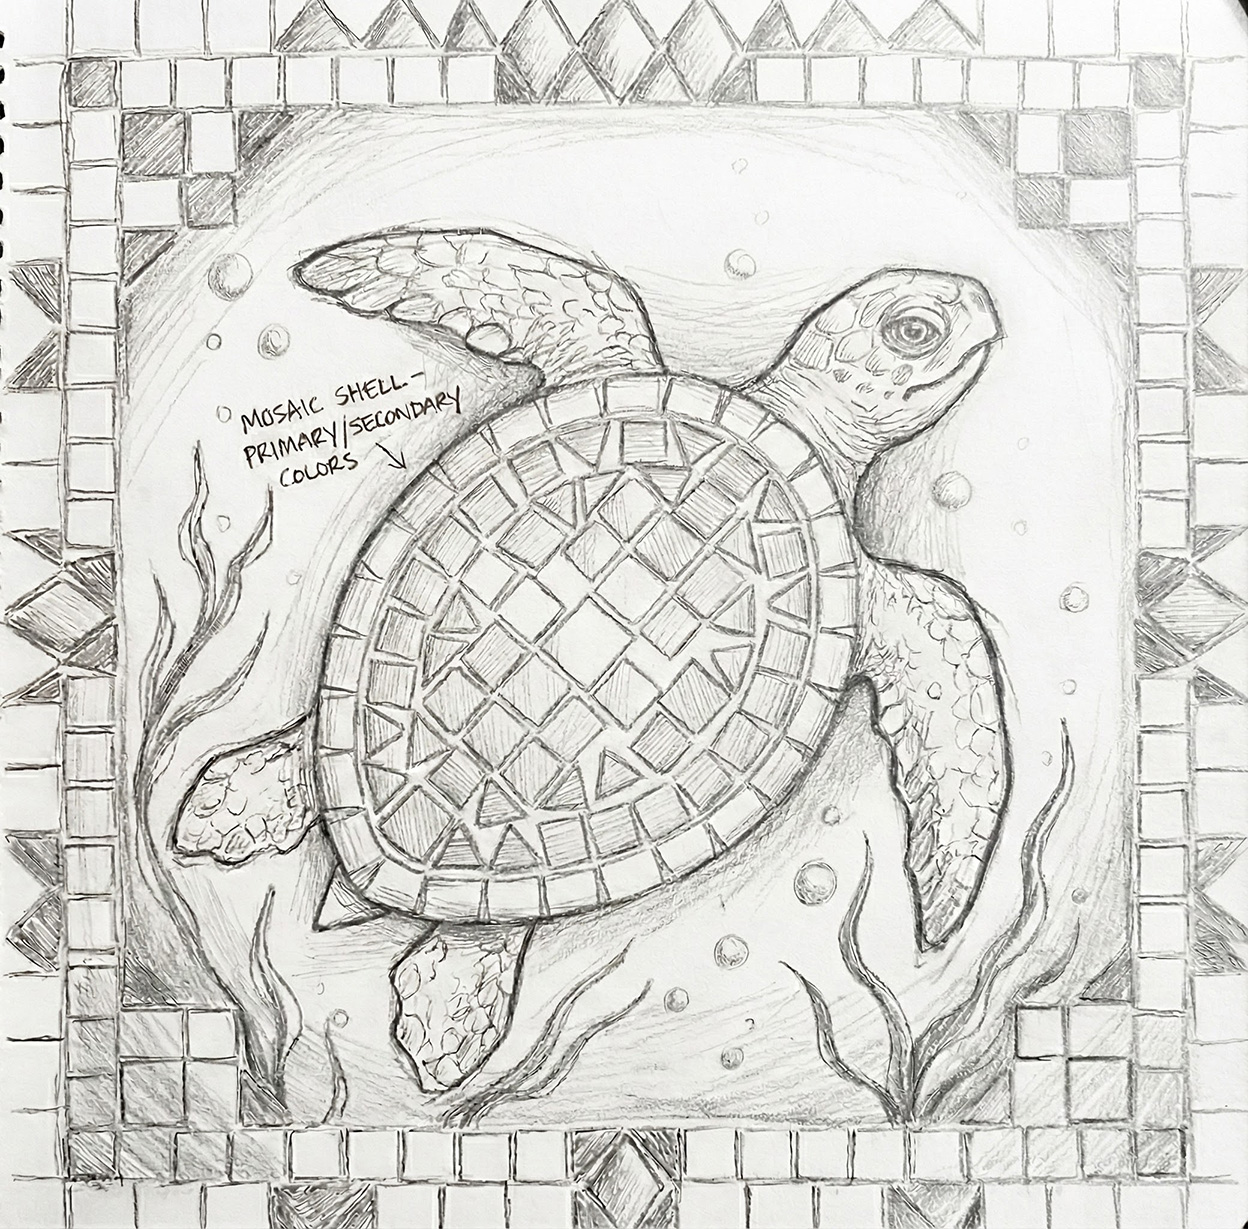
Complete a full sketch of your final design in your sketchbook before starting. This should show your overall composition, where your tessellated pattern will go, and your color plan.
2 Tessellated Pattern
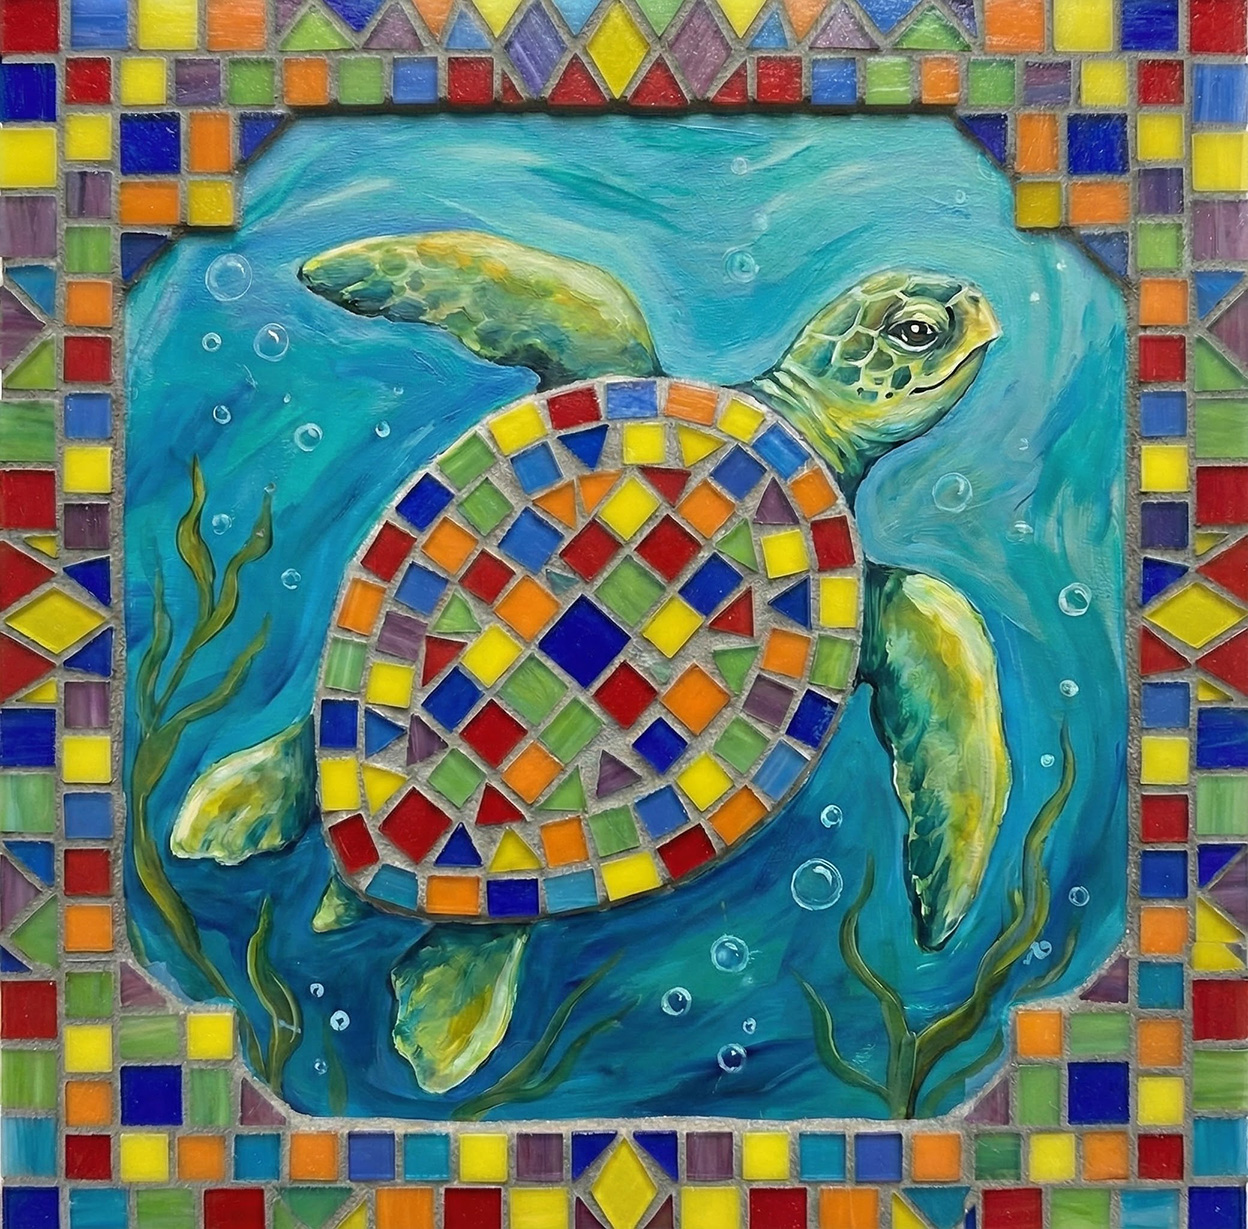
Include your geometric pattern from Lesson 3, tessellated (repeated) at least 3 times. Your pattern can be used as:
- A decorative border
- A background texture
- Part of your foreground image (shell of a turtle, wall of a house, texture of a tree, scales on a fish, etc.)
3 Tile Coverage
Glass tiles must cover at least 50% of your 10×10" board. The remaining area (50% or less) can be painted on the same board or a separate board that will be attached to create an even surface for grouting.
Materials Provided
Your Mosaic Kit
Step-by-Step Process
Phase 1: Planning & Design
Draw your complete design in your sketchbook. Include:
- The overall composition and subject
- Where your tessellated pattern will appear (mark clearly!)
- Which areas will be tiled vs. painted
- Your color scheme
Lightly sketch your design onto your 10×10" plywood board using pencil. Keep lines light – they'll be covered by tiles and grout.
Phase 2: Tile Work (Complete First!)
Arrange all your tiles on the board without glue first. This lets you:
- See your complete design before committing
- Make adjustments to spacing and color placement
- Ensure your tessellated pattern repeats correctly
💡 Pro Tip: Spacing
Leave approximately 1/16" gaps between tiles for grout. Consistent spacing creates a professional look!
This technique keeps your design intact while gluing:
- Press a small ball of Blue Tack Putty onto the eraser end of your pencil
- Dispense a small puddle of Aleene's Tacky Glue into your plastic container
- Use the Blue Tack end to pick up a placed tile (like a suction cup)
- Dip the bottom of the tile into the glue puddle
- Place the tile back in its exact same position on the board
- Press gently to secure
- Repeat for all tiles!
⚠️ Important
Work in small sections so you don't lose track of your design. Complete all tile work before moving to painting!
Phase 3: Painted Elements
For any areas that will be painted (up to 50% of your design), you have two options:
Option A: Paint on the Original Board (Recessed Look)
- Paint directly on your 10×10" plywood board
- The painted areas will sit lower than the glass tiles, creating a recessed effect
- This gives your mosaic more depth and dimension
Option B: Paint on a Separate Board (Level Surface)
- Cut your second board to match the shape of your painted area
- Paint your design on this separate board using acrylic paint
- The painted board will be attached so it sits at the same height as the glass tiles
Whichever option you choose, allow paint to fully dry before proceeding.
💡 Which Option Should I Choose?
Choose Option A if you want your painted areas to have a recessed, layered look with more visual depth. Choose Option B if you want a smooth, even surface where tiles and painted areas are at the same level for a polished, professional finish.
If you chose Option B, glue your painted board section onto the main canvas using Aleene's Tacky Glue once it's dry. Press firmly and allow to dry. If you chose Option A, skip this step!
Phase 4: Drying Period
Before grouting, your mosaic must dry for at least 24 hours. This ensures:
- All tiles are firmly bonded
- Painted areas are dry (and painted board is securely attached if using Option B)
- Glue is fully cured and won't shift during grouting
⚠️ Do Not Rush This Step!
Grouting before the glue is fully cured can cause tiles to shift or pop off. Patience here means a better final result!
Phase 5: Grouting Process
Before applying grout:
- Cover ALL painted areas with masking tape – press edges firmly!
- Ensure your work surface is protected with newspaper or plastic
- Have damp sponges and clean water ready
- Wear old clothes – grout can be messy!
Mr. Brossman will provide pre-mixed white grout (one quart per table of 6-8 students).
Scoop & Spread: Using a grout float or plastic spreader, scoop a generous amount of grout onto your mosaic. Spread it across the tiles at a 45° angle, pushing grout into all the gaps.
Work Diagonally: Spread grout diagonally across the tile pattern to fill gaps without pulling grout out. Work in sections, ensuring all 1/16" gaps are completely filled.
Remove Excess: Hold your spreader at a 90° angle and scrape off excess grout from the tile surfaces. Work diagonally to avoid pulling grout from the gaps.
Wait 10-15 Minutes: Allow the grout to begin setting. It should become firm but not completely hard. The surface will start to look hazy.
First Wipe: Using a damp (not wet!) sponge, gently wipe the tile surfaces in circular motions. Rinse your sponge frequently. This removes the grout haze from the tiles.
Shape the Grout Lines: As you wipe, the grout lines should become smooth and slightly recessed below the tile surface. If lines are too low, add more grout.
Final Polish: After the grout has set for about 30 minutes, do a final wipe with a clean, dry cloth to remove any remaining haze and polish your tiles.
Remove Tape: Carefully peel off the masking tape from painted areas while grout is still slightly pliable. Touch up any edges if needed.
💡 Grouting Tips
- Keep your sponge damp, not soaking wet – too much water weakens grout
- Work quickly but carefully – grout sets faster than you think!
- Don't press too hard when wiping – you'll pull grout from the gaps
- Rinse your sponge frequently for the cleanest results
Allow your grouted mosaic to cure for 24-48 hours before handling. The grout will continue to harden and achieve its final white color during this time.
Appreciation vs. Appropriation
Remember: We are learning FROM Middle Eastern mosaic traditions, not claiming them as our own. Your geometric pattern is inspired by Islamic geometric art principles, but your final mosaic tells YOUR story. Whether your subject is personal, natural, emotional, or cultural – you're using traditional techniques to express your own identity and meaning.
Reflection Questions
After completing your mosaic, respond to the following questions in your artist statement (submit via MS Teams):
Assessment Rubric
Your mosaic will be assessed using our 0-4 mastery scale:
| Criteria |
4
Exceeds
|
3
Meets
|
2
Approaching
|
1
Beginning
|
0
Not Yet
|
|---|---|---|---|---|---|
| Tessellated Pattern VA:Cr2.1.7 |
Pattern tessellates 4+ times with precise alignment and intentional integration into the composition as a meaningful design element. | Pattern tessellates 3 times with accurate repetition and clear integration into the design. | Pattern tessellates 2 times or shows minor inconsistencies in repetition. | Pattern appears but doesn't tessellate correctly or is repeated only once. | No tessellated pattern included or pattern unrecognizable. |
| Technical Craftsmanship VA:Cr2.1.7 |
Exceptional tile placement with consistent 1/16" spacing. Grouting is clean and even. Painted elements are precise and well-integrated. | Tiles are securely placed with mostly consistent spacing. Grout is applied neatly. Painted areas are clean. | Some inconsistency in tile spacing or placement. Grout application shows minor issues. Paint may have some imprecision. | Significant gaps in tile coverage, inconsistent spacing, or messy grout application. | Project incomplete or shows minimal craftsmanship effort. |
| Design & Composition VA:Cr1.2.7 |
Thoughtful, cohesive design with strong visual balance. Color choices enhance meaning. Sketchbook shows thorough planning. | Clear design with good composition. Color choices are intentional. Sketchbook sketch is complete. | Design is present but may lack cohesion or balance. Some planning evident in sketchbook. | Design is unclear or underdeveloped. Minimal sketchbook planning. | No clear design or sketchbook preparation. |
| Cultural Understanding VA:Cr2.2.7, VA:Cn11.1.7 |
Demonstrates deep understanding of mosaic traditions while creating original personal expression. Reflection shows sophisticated thinking about appreciation vs. appropriation. | Shows understanding of Islamic geometric principles. Personal expression is connected thoughtfully to traditional techniques. | Some connection to cultural traditions but may not clearly differentiate personal expression from imitation. | Limited evidence of understanding cultural context or connection. | No evidence of cultural understanding or connection. |
| Artist Reflection VA:Cr3.1.7 |
Reflection shows deep insight into creative process, challenges, and meaning. All questions answered thoughtfully with specific examples. | Reflection addresses all questions with clear explanations and personal insight. | Reflection answers most questions but may lack depth or specificity. | Reflection is incomplete or superficial. | No reflection submitted. |
Project Timeline
Complete sketchbook design, transfer to board, gather materials
Dry-lay design, then glue tiles using Blue Tack technique
Paint directly on board (Option A) or create and attach painted board sections (Option B)
Allow 24-hour cure time (work on reflection questions)
Apply grout, clean tiles, allow to cure
Final polish, photograph work, complete and submit artist statement