Art Around the World
Mr. Brossman | VA-104
Important: End of Semester Information
We have 6 days remaining in the semester. This Dream Catcher project is NOT graded.
- Option 1: If you have completed ALL graded assignments from Units 1-4, you may work on the Dream Catcher project.
- Option 2: If you have incomplete or missing assignments from Units 1-4, use this time to finish them for a grade.
- Option 3: If you want to rework previous assignments for a better grade, you may do so.
- Option 4: If you are satisfied with your current grade (whether good or not so good), you may work on the Dream Catcher project.
Choose the option that works best for YOU!
Welcome to Native American Art!
In our final unit, we'll explore the rich artistic traditions of the Indigenous peoples of North and South America. We'll focus especially on the Native tribes of the Pacific Northwest, including Washington State, and create our own dream catchers inspired by Ojibwe tradition.
Unit Overview
Project Materials
Your Dream Catcher Kit:
- Cedar Hoop – The circular frame for your dream catcher
- Yarn – For wrapping the hoop and weaving the web
- Beads – Decorative elements for the web and dangles
- Feathers – Traditional hanging elements
- Pencil – For planning and sketching
- Hot Glue – For securing elements
- Scissors – For cutting yarn
What You'll Learn
Day 1
Brief history of Native American art with focus on Northwest Coast tribes of Washington State
Days 2-3
Wrap your cedar hoop with yarn and begin weaving the web pattern
Days 4-5
Complete the web, add beads, and attach feathers and decorations
Day 6
Finishing touches and share your completed dream catcher
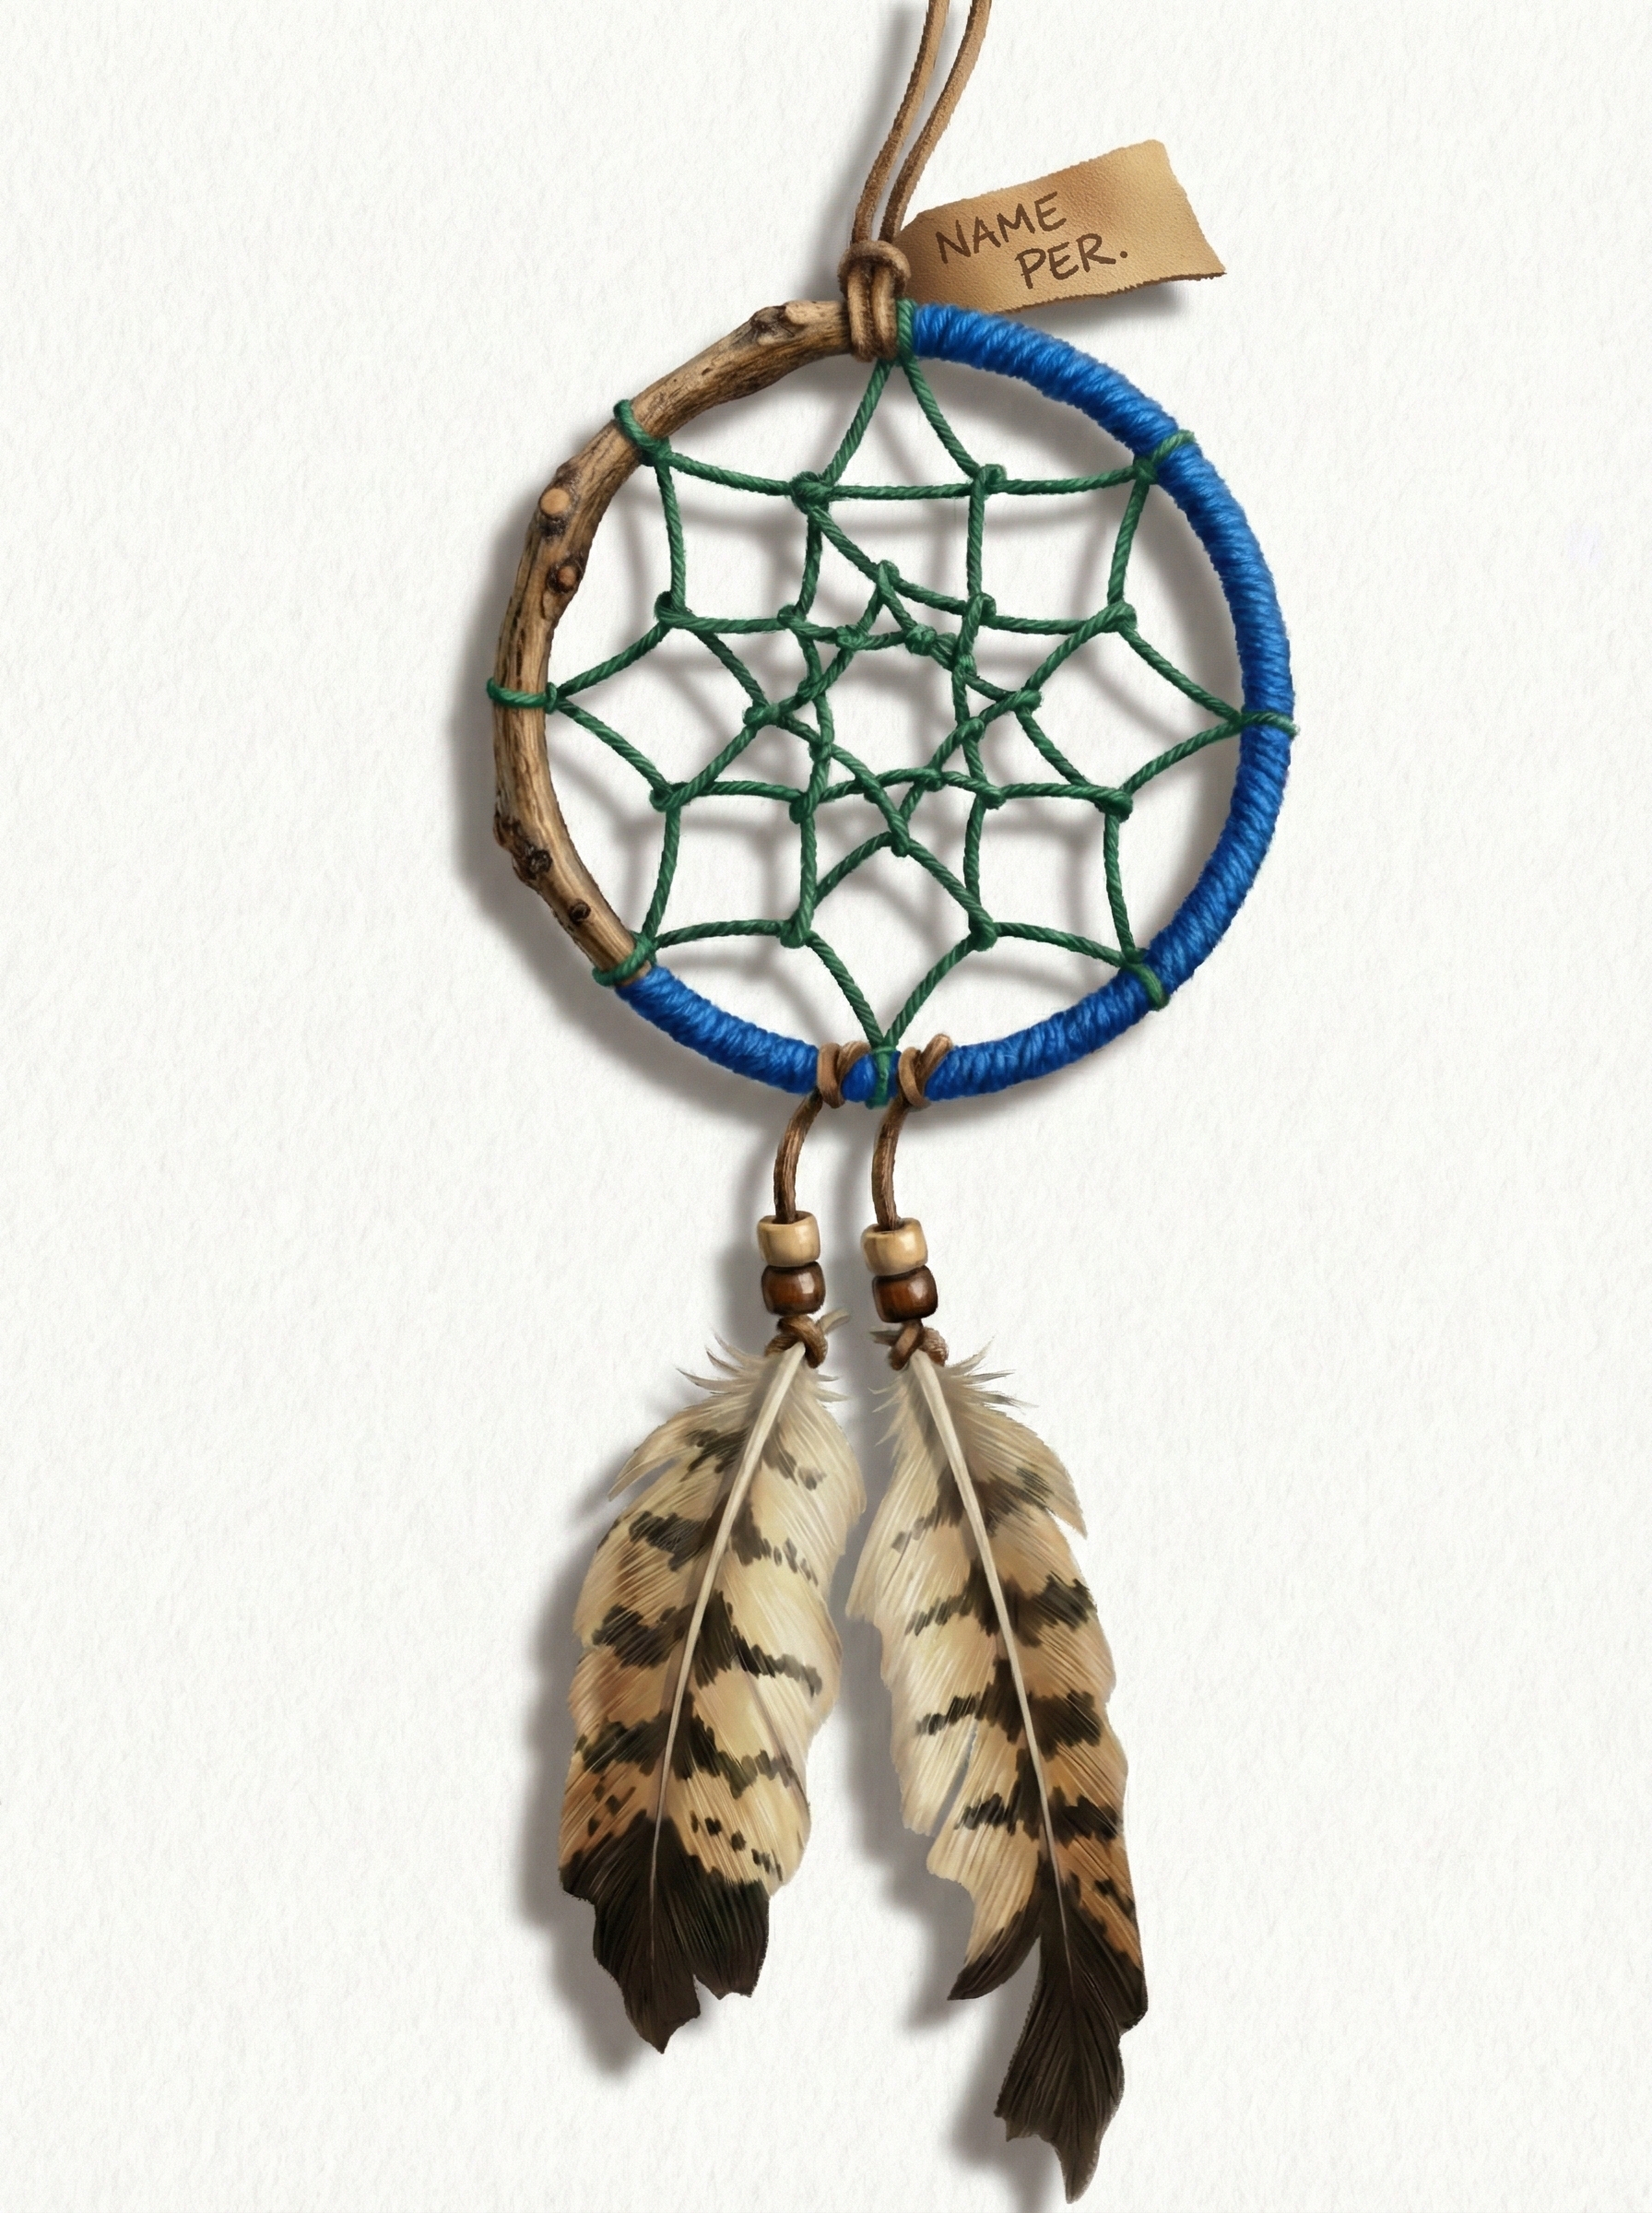
Completed Dream Catcher Example

Your dream catcher will look similar to this when complete!
Cultural Respect
Dream catchers originated with the Ojibwe (Chippewa) people. While we're creating our own versions, it's important to understand and respect the cultural significance of this tradition. We are learning FROM Native American art traditions, not claiming them as our own. Our projects are inspired by these traditions while expressing our own creativity.
The Art of the First Peoples
Think About It: The Indigenous peoples of North and South America created art for thousands of years before European contact. Their art wasn't just decoration – it told stories, recorded history, honored spirits, and connected communities. How might art serve a different purpose when it's deeply connected to daily life, spirituality, and survival?
Today we'll take a brief journey through Native American art traditions, with a special focus on the Indigenous peoples of the Pacific Northwest – the tribes who have called Washington State home for thousands of years.
Overview: Native American Art Traditions
Native American art is incredibly diverse – there are over 570 federally recognized tribes in the United States alone, each with unique artistic traditions. Common elements across many traditions include:
Connection to Nature
Art often depicts animals, plants, and natural elements that were central to daily life and spirituality
Symbolic Meaning
Colors, shapes, and images carry deep cultural significance and tell stories
Functional Art
Many beautiful objects – baskets, pottery, clothing – were also practical items for daily use
Passed Down Knowledge
Artistic techniques and designs were taught within families and communities across generations
Watch: Native American Art Overview
Focus: Pacific Northwest Coast Art
The Pacific Northwest Coast stretches from Alaska through British Columbia and down to Washington State. The tribes of this region developed one of the world's most distinctive art styles.
Washington State Tribes
Washington is home to 29 federally recognized tribes. Some of the major tribal nations include:
- Coast Salish peoples – Including the Tulalip, Muckleshoot, Puyallup, Snoqualmie, and many others
- Makah – Known for their ocean-going canoes and whaling traditions
- Quinault – Master basket weavers of the Olympic Peninsula
- Yakama Nation – Of the Columbia Plateau region
- Spokane Tribe – Of the inland Northwest
Northwest Coast Art Characteristics
Dream Catchers: Ojibwe Origins
While dream catchers are now associated with many Native American cultures, they originated with the Ojibwe (also called Chippewa or Anishinaabe) people of the Great Lakes region.
The Legend
According to Ojibwe tradition, a spiritual figure called Asibikaashi (Spider Woman) protected the people, especially children. As the Ojibwe nation spread across North America, she could no longer reach everyone, so mothers and grandmothers began weaving magical webs on willow hoops.
How They Work
Dream catchers were hung above sleeping areas. Good dreams know how to pass through the center hole and slide down the feathers to the sleeper. Bad dreams get caught in the web and are destroyed by the morning light.
Did Pacific Northwest Tribes Make Dream Catchers?
Traditionally, dream catchers were specific to the Ojibwe and neighboring Great Lakes tribes, not the Pacific Northwest Coast tribes. However, during the Pan-Indian movement of the 1960s-70s, dream catchers became a symbol of Native American identity across many tribes. Today, many Native artists from various tribes create their own interpretations of dream catchers. Our project honors the Ojibwe tradition while we also learn about the diverse art of Pacific Northwest tribes.
Traditional Dream Catcher Elements
The Hoop
Originally made from bent willow branches, representing the circle of life
The Web
Woven similar to a spider's web, with 8 points representing the eight legs of the spider
The Center Hole
Allows good dreams to pass through to the sleeper
Feathers
Represent breath or air, and help good dreams float down gently
Beads
May represent the spider that wove the web, or captured good dreams
Click to view full size
Day 1 Activity: Native American Art Research & Dream Catcher Design
Use class time today to research and plan your dream catcher. Complete the following in your sketchbook or OneNote:
Part A: Pacific Northwest Art Research (15-20 minutes)
Choose ONE Washington State tribe to research. Find answers to the following:
- What is the name of the tribe and where in Washington are they located?
- What types of art are they known for? (totem poles, basket weaving, carving, beadwork, etc.)
- Find and print/sketch 2-3 examples of their artwork
- What symbols, animals, or designs appear in their art?
Tribes to choose from: Tulalip, Muckleshoot, Puyallup, Snoqualmie, Makah, Quinault, Yakama, Spokane, Lummi, Snohomish, Duwamish, Nisqually, or any other Washington State tribe
Part B: Web Pattern Design with the Geometric Pattern Maker (15-20 minutes)
Remember the geometric patterns you learned about in Unit 4? The web inside a dream catcher is also a geometric pattern! Use the Geometric Pattern Maker App to design your web pattern.
How to use the app for your dream catcher web:
- The app starts with a circle – just like your cedar hoop!
- Experiment with different numbers of points around the circle (traditional dream catchers use 8 points for the spider's 8 legs)
- Try different connection patterns to see what web designs are possible
- Screenshot or sketch your favorite pattern to use as a guide when weaving
After designing your web pattern, also plan:
- Color Scheme: What colors will you use for wrapping your hoop? For the web? Why did you choose these colors? (Consider the color meanings listed above, or choose colors meaningful to YOU)
- Beads: How many beads will you include in your web? What colors?
- Feathers: How many dangles will you have? (1, 2, or 3?) What colors?
- Sketch: Draw a simple sketch of what you want your finished dream catcher to look like. Include your web pattern and label the colors you'll use.
Part C: Reflection Questions (10 minutes)
Answer the following in 2-3 sentences each:
- Why do you think art was so important to Native American communities?
- How is the purpose of a dream catcher different from art that hangs in a museum?
- What will your dream catcher represent or mean to YOU personally?
Helpful Research Links
- Washington Indian Gaming Association - Tribal Links
- Burke Museum - Native American Collections
- Search: "[Tribe name] art" or "[Tribe name] culture" for specific tribes
Coming Tomorrow: Start Your Dream Catcher!
Tomorrow we'll begin wrapping our cedar hoops with yarn. Make sure you've decided on your colors!
Getting Started
Today we begin creating our dream catchers! The first step is wrapping the cedar hoop with yarn. This creates a colorful, soft base and covers the raw wood.
Today's Materials:
- Cedar hoop
- Yarn (choose your color)
- Scissors
- Hot glue gun
Step-by-Step: Wrapping Your Hoop
Cut a long piece of yarn – about 3-4 arm lengths. It's better to have too much than too little!
Use a small dab of hot glue to attach the end of your yarn to the hoop. Hold it in place until it sets (about 10 seconds).
Wrap the yarn around the hoop, keeping each wrap close to the previous one. Pull tight but not so tight that the yarn breaks. Cover the glued end as you wrap.
Keep wrapping in the same direction all the way around the hoop. Make sure there are no gaps where the wood shows through.
If you run out of yarn before finishing, use a small dab of hot glue to secure the end. Then start a new piece slightly overlapping where you stopped.
When you've wrapped all the way around and returned to your starting point, use hot glue to secure the final end. Tuck it under the previous wraps for a clean finish.
Color Meanings
In many Native American traditions, colors have symbolic meanings. While these vary by tribe, here are some common associations:
- White – Purity, peace, winter
- Red – Strength, energy, life
- Yellow – Happiness, sunlight, warmth
- Blue – Sky, water, wisdom
- Green – Earth, plants, growth
- Black – Night, mystery, strength
Feel free to choose colors that have personal meaning to YOU!
Tips for Success
- Take your time – neat wrapping looks much better than rushed wrapping
- Keep consistent tension on the yarn
- If you make a mistake, you can unwrap and redo a section
- Make sure wraps are touching with no wood showing
Weaving the Dream Catcher Web
Today we begin the most magical part – weaving the web that will catch your dreams! This is the traditional part of the dream catcher that requires patience and focus.
Today's Materials:
- Your wrapped hoop (from Day 2)
- Yarn or string (same or different color)
- Scissors
- Optional: Beads to add to the web
Step-by-Step: Creating the Web
Note: This is only one way of many to wrap a pattern around a dreamcatcher. There are hundreds of great tutorials on YouTube if you'd like to explore other weaving styles!
Before starting the web, tie a small loop of yarn at the top of your hoop. This is where you'll hang your finished dream catcher.
Cut a piece of yarn about 6-8 arm lengths long. You need a lot for the web!
Tie one end of the yarn securely to the hoop, right next to your hanging loop. Double knot it so it won't come loose.
Stretch the yarn across the hoop and loop it around the hoop at an equal distance (about 1.5-2 inches). To make the loop: wrap the yarn around the hoop, then bring the yarn through the loop you created, pulling snug. This is called a hitch knot.
Keep making hitch knots around the hoop at equal intervals. You should have 8-12 anchor points around the entire hoop when you return to your starting point. Traditional dream catchers have 8 points (for the spider's legs).
Instead of looping around the hoop, now loop your yarn around the MIDDLE of each yarn section from the first round. This brings your web spiraling inward toward the center.
As you weave, you can slide a bead onto the yarn before making your next hitch knot. This traps the bead in your web!
Troubleshooting Tips
- Web looks loose? Pull each hitch knot tight before moving to the next
- Web looks uneven? Try to space your anchor points equally around the hoop
- Yarn keeps tangling? Work with shorter lengths and add more yarn when needed
- Hard to see what you're doing? Use a contrasting color yarn for the web
End of Day 3
By the end of today, you should have completed the first 2-3 rounds of your web. We'll continue weaving toward the center tomorrow!
Spiraling to the Center
Today we'll continue weaving our web toward the center. Remember to leave a small hole in the middle – this is where good dreams pass through!
Continuing the Web
Continue making hitch knots in the middle of each yarn section, spiraling inward with each round.
As you get closer to the center, it's important to maintain even tension. Not too tight (which warps the web) and not too loose (which makes it saggy).
Stop weaving when you have a small hole in the center (about the size of a nickel or quarter). This hole is important – it's where good dreams pass through!
When you're happy with your center hole, tie off the yarn with a secure knot. You can add a small dab of hot glue to make sure it doesn't come undone. Trim excess yarn.
The Importance of the Center Hole
In traditional Ojibwe dream catchers, the center hole is essential. Good dreams know the way through the hole and slide down the feathers to the sleeping person below. Without the hole, even good dreams would get trapped! Some modern dream catchers add a bead in the center to represent the spider.
Check Your Progress
- Is your web relatively symmetrical?
- Are all your hitch knots secure?
- Do you have a center hole for good dreams?
- Is the overall tension even (not too tight or loose)?
Next Steps
With your web complete, tomorrow we'll add the feathers and any additional decorations!
Bringing Your Dream Catcher to Life
Today we add the finishing touches that make dream catchers so beautiful – feathers, beads, and other decorations hanging from the bottom of the hoop.
Today's Materials:
- Your dream catcher with completed web
- Feathers
- Beads
- Yarn or string for dangles
- Scissors
- Hot glue gun
Step-by-Step: Adding Dangles
Traditional dream catchers often have 1-3 dangles hanging from the bottom. Decide how many you want and where they'll go (center bottom, or spread along the lower half).
Cut pieces of yarn for each dangle – they can be the same length or different lengths for visual interest. About 6-10 inches works well.
Tie each dangle string securely to the bottom portion of your hoop. Double knot to make sure it's secure.
Thread beads onto each dangle string. You can use one large bead or several smaller ones. The beads help weigh down the feathers.
Slide the quill (stem) of each feather through the hole of your last bead, OR use a small dab of hot glue to attach the feather to the end of the string. The bead method looks cleaner.
Add a small dab of hot glue where the feather meets the last bead to keep it from falling out. Trim any excess yarn below the feathers.
The Meaning of Feathers
In Ojibwe tradition, feathers represent breath and air. They help good dreams float gently down to the sleeping person. Different birds' feathers also have different meanings:
- Owl feathers – Wisdom (traditionally for women's dream catchers)
- Eagle feathers – Courage (traditionally for men's dream catchers)
Note: Our classroom feathers are craft feathers, not from specific birds. Choose colors you like!
Optional Extra Decorations
- Add more beads throughout the web
- Wrap additional yarn colors around sections of the hoop
- Add small charms to the dangles
- Create multiple dangles at different lengths
Final Day!
Today is our last day! Use this time to add any final touches to your dream catcher, make sure everything is secure, and share your creation with the class.
Final Checklist
Is your hanging loop secure at the top? Test it by holding your dream catcher by the loop.
Are there any gaps in your yarn wrapping? Add extra wraps or a dab of glue if needed.
Are all the knots in your web tight? Gently tug on different sections to test.
Do you have a center hole for good dreams to pass through?
Are your feathers and beads securely attached? Give them a gentle tug.
Trim any loose yarn ends. Remove any visible glue strings.
Sharing Your Dream Catcher
Discussion Questions
- What colors did you choose and why?
- What was the most challenging part of making your dream catcher?
- What are you most proud of?
- Where will you hang your dream catcher?
Taking Care of Your Dream Catcher
Dream catchers are traditionally hung near sleeping areas – above the bed or near a window where morning light can reach it. According to tradition, the morning sun destroys any bad dreams caught in the web during the night. Treat your dream catcher gently, as the web can be delicate.
Congratulations!
You've completed your dream catcher! You've learned about Native American art traditions, practiced patience and craftsmanship, and created something beautiful and meaningful. Great work this semester in Art Around the World!
Resources
Project Materials
Complete Materials List:
- Cedar Hoop – Circular frame
- Yarn – For wrapping and weaving
- Beads – Various colors for decoration
- Feathers – For dangles
- Pencil – For planning
- Hot Glue Gun – For securing elements
- Scissors – For cutting
Key Vocabulary
Cultural Context
Cultural Appreciation
When creating art inspired by other cultures, we should always approach with respect and understanding. We learn about the history and meaning behind traditions, give credit to the cultures that created them, and create our own personal interpretations rather than claiming the traditions as our own. This project honors Ojibwe traditions while also exploring the broader world of Native American art.
Learn More
Ojibwe Culture
Learn about the people who created dream catchers
WA State Tribes
Discover the 29 tribes of Washington
Northwest Coast Art
Explore formline design and totem poles
Native Art Today
Contemporary Native American artists
Remember!
Grading Options
This Dream Catcher project is NOT graded. You have options:
- Complete the Dream Catcher if all previous work is done
- Work on missing assignments from Units 1-4 for a grade
- Rework previous assignments for better grades
- Do the Dream Catcher if you're satisfied with your current grade